A guide to taking 360 photos of your asset and uploading your photos the correct way.
Overview
This guide will help you take 360 photos and upload them to your Vault Asset the correct way which will help in the long run with organising your asset with the 2D Plans, Progress Photos & Asset Management.
When to use it
Read through this guide prior to taking 360 photos of your project, this will save time and will be more organised for the future build/asset management.
How to use it
360 Camera, Apps + Accessories
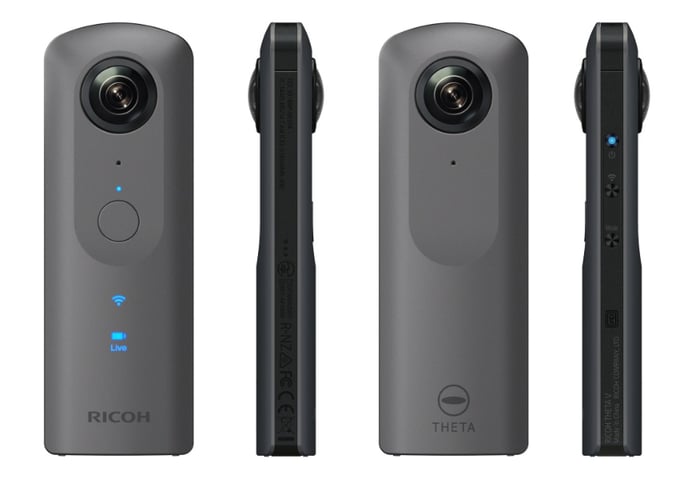
RICOH THETA 360 Camera
We recommend the Ricoh THETA V 4k 360 Spherical Camera you can either buy this camera yourself or we can source it for you. Just contact our Support Team.
THETA Apps
Download Ricoh THETA for your smartphone or tablet from the below links
Accessories
- RICOH THETA Stand TD-1 (Tripod)
- RICOH THETA Stick TM-2/TM-3
Creating Points of Interest (POI) prior to capturing 360 Photos
Mark up on a PDF of the floor plan either by hand or on the computer of the points of interest you wish to capture. If it is a big room, or the view is obstructed, make sure there are multiple points of interest in that same room and label them as mentioned below - the date is not required for the POI as it remains the same throughout the lifetime of the project.
If you've marked it out on a PDF, print it and take it to site to locate the capture of your 360 Photos for the first progress capture to mark where you take the photos; otherwise take a tablet device so you can align your capture with your POIs.
Capturing 360 Photos
Set up the RICCOH THETA app on your phone or tablet and connect the RICOH THETA V camera to the app.
You will need access to internet or mobile data to use the app with the camera.
Go to your first POI you marked on the floor plan and take a photo either using the stick and holding it above your head or attaching the stand (tripod) and placing it on the ground. Press the shooting button and your photo is captured and stored on the app.
When capturing the 360 images, make sure you take them in the order marked on the floor plan. This will save you time when you upload the photos to Vault.
Once you have captured all of the POI marked on the floor plan, you can start transferring to your computer. Once all transferred to you computer you will need to delete any duplicates and rename the photos to match the POI name, following the naming convention below.
360 Photo Naming Convention
We recommend naming the photos the same as the Points of Interest on the 2D Plans in the Design Nav (Plan Viewer); which should be as follows (example in bold):
- Date - YYMMDD
- Floor/Level - GF
- Room/Location - Bedroom 26
- Where in the room - Center
- It will then read as GF-Bedroom26-Center
Uploading 360 Photos to Vault
The following steps can be used to add a 360 Photos, regular photos, video, documents and placeholders for both new media and progress update media.
If you have not uploaded a 2D floor plan to your plan viewer, watch this video tutorial to learn how.
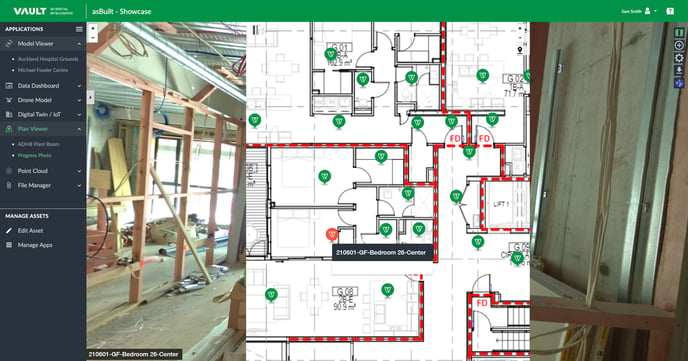
![]() Open Plan Viewer and the level you are uploading the photo; click the floor plan map icon and the floor plan will appear.
Open Plan Viewer and the level you are uploading the photo; click the floor plan map icon and the floor plan will appear.
![]() Once the floor plan appears click the Point of Interest Button, located top right of the floor plan.
Once the floor plan appears click the Point of Interest Button, located top right of the floor plan.
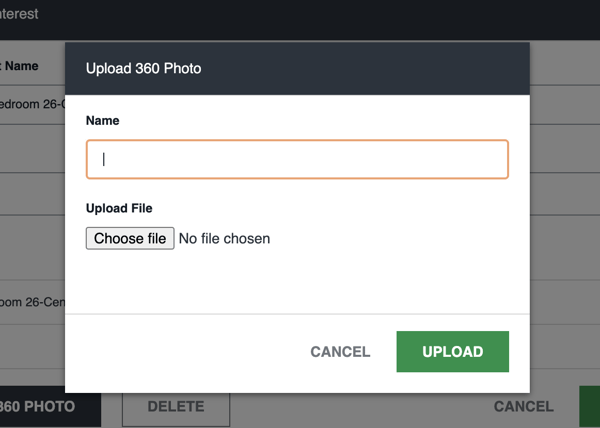
Click on the POI you want to upload the 360 Photo for and click Upload 360 Photo button.
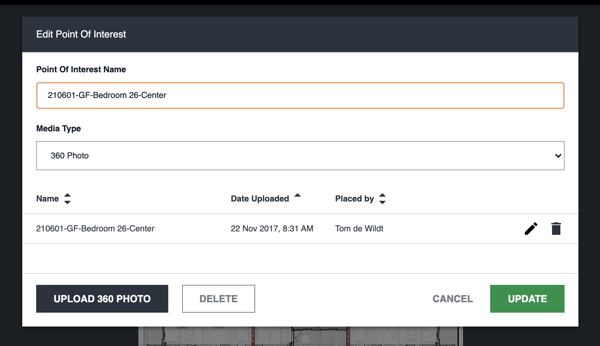
Type the name of the file making sure it matches the POI name. Choose the file you want to upload and click upload.
If it is a progress photo the file name should still match the POI name, except for the date at the start, that will be the day the photo was taken.
Once the photo has been upload Click Update on the Edit Point of Interest window and then Save on the Progress Photo Floor Plan Window (top right corner).
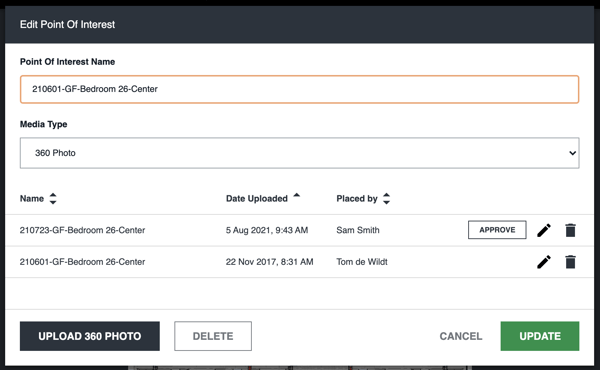
Once the plan has been saved the Photo needs to be approved, you can only approve photos if you have the correct permissions (Owner, Admin or BIM Manager).
To approve the photo click the POI you want to approve and the the Approve button.
Repeat the above steps until all your 360 photos have been uploaded.
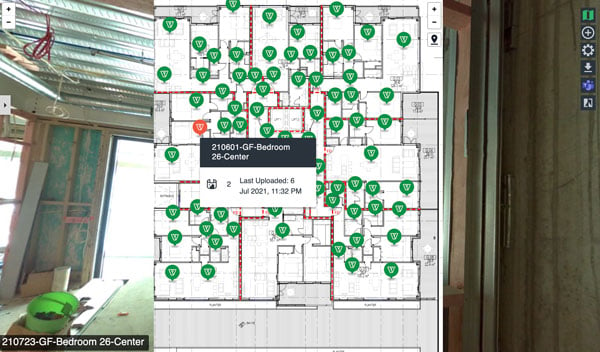
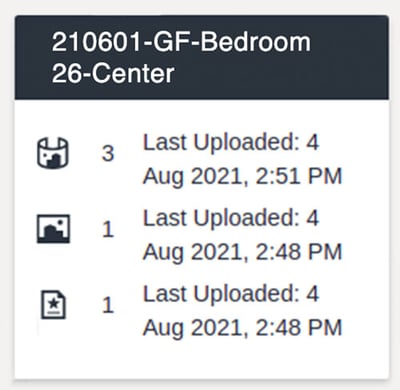
When the photos have been approved you are back on the floor plan view, when you hover over the POI marker it will show how many photos have been uploaded to that point (or videos, images, documents, etc) and the date and time they were uploaded.